12 Features of a Unique Revit Engineered Floor System Family
Jan 30, 2023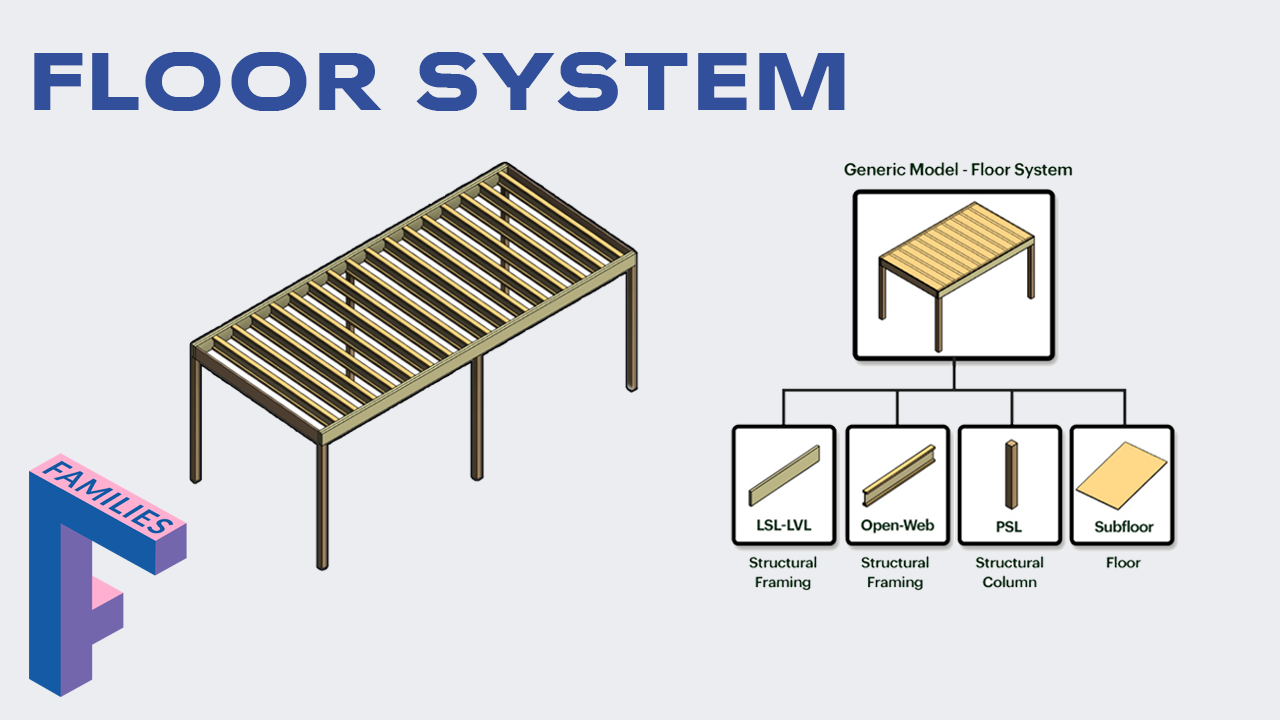
In recent months, I have collaborated with the Quebec Wood Export Bureau (QWEB) and Offsite Wood to create an innovative, unique Revit family. It is a parametric engineered floor system.
Disclaimer: the family is for information and early-phase modeling only. Hire an engineer for actual calculations and precise structural dimensions.
Click here to download this family.
The family contains joists, beams, a subfloor, and columns. Everything is parametric! Check out this GIF:
 Why exactly should you use this family? This is meant as an early phase family to quickly model structure with real dimensions. You can copy and paste them to create a building layout:

You can watch a video version of this guide:
All the structural elements are integrated as nested shared families. That means that they are individually part of the Revit model and can be scheduled. Each generic model family contains all these nested shared components:

All of these nested families are shared, which means they are individually part of the Revit database. When the dimensions of the engineered floor system are changed, the schedule automatically updates.

In the type properties of the family, you will find the joist spacing parameter.

In the instance properties of the system, you can modify the Length, the Width, and the Floor-to-Floor Height.

You can set the values of the dimensions directly in the properties, but you can also drag the blue arrows to adjust the Width and Length of the family.

A limitation of this technique is that the values are rounded to multiple digits... For example, 15’-7 189/256” 🤔
For better precision, type in the value in the properties.
The family calculates how many columns are required based on the length.
For a Length up to 16’, there are 4 columns.

Between 16’ and 24’, there are 6 columns.

Beyond 24’, there are eight columns.

It is possible to switch from one structural column type to another. In this example, there are 3 1/2” and 5 1/4” PSL Columns.
To swap columns, go to the type parameters. However, make sure to pick types only from this QWEB_PSL family. If you try a different column family, you will probably get a warning or strange behavior because the family is set up differently.

You can see what happens to the family:


The Depth of the structural framing automatically adjust based on the Width. Here are the spans used:
Between 0' to 16'-0" = Structure Depth: 9 1/2"
Between 16'-1" to 20' = Structure Depth: 11 7/8"
Between 20'-1" to 26'-0" = Structure Depth: 14"
Between 26'-1" to 30' = Structure Depth: 16"

The width of this module should never go beyond 30’. If a value above 30’ is entered, the structural framing disappears and a 3D text warning is displayed:

Overall, this family is in the Generic Model Category. However, it also includes a nested, shared subfloor family.
Normally, the floor category cannot be used when creating a new family. However, we’ve managed to create one using a super-secret trick. 🙂

You can tab-select the subfloor and hide if you want. Also, you can use V/G menu to shut down all floors or this specific subcategory.

You can also shut down the “Subfloor Visibility” parameter in the type properties. However, this removes the subfloor entirely from the model.

When using the Coarse level of detail, you will only see a translucent slab that represents the thickness of the structural system.
When using the Medium level of detail, the structural elements appear.
With the Fine level of detail, metal hangers appear for the joists.

The container file of this family includes 3 pre-made schedules. Obviously, these are live schedules that will automatically update if the dimensions of the structural systems are modified. First, here’s a schedule that contains all columns:

For the columns to be included in the this schedule, they need to have the Type Comments parameter set to SYSTEM.

The second schedule contains all Structural Framing elements. Again, they need to have the SYSTEM value in the Type Comments parameter to appear here.

You can see that there are LSL, LVL and Open-Web types. These titles are used from the Description parameter of each structural type:

Finally, here is a a schedule that contains all module (or full floor structural system). It contains the Mark value, the Width, the Length and the Floor-to-floor height.

Even the best Revit family is useless without a proper explanation. When you download the engineered floor system, it is part of a container file. The starting view includes instructions and tips on how to use the family:

Of course, feel free to experiment with this family.
Click here to download the family.
Thanks to our partners at QWEB and Offsite Wood!

How to make a 3D warning text appear when a dimension isn’t respected;
How to properly integrate nested shared families;
Add blue arrows to adjust dimensions in 3D views;
Nest a family from the “floor” category;
Automatically adjust the structural depth based on the Width.
Interested? Download here, along with the entire pamphlets collection.
Enter your details below to get this free guide.